Crewneck Design Placement Guide: Front, Back, Sleeve & Collar Print Zones
Master design placement on crewneck sweatshirts. Learn optimal dimensions, pros and cons for each print zone, and how to combine multiple placements for maximum impact.
Jordan Reeves
Brand Experience Strategist at RareCustom. BFA in Graphic Design from Parsons School of Design with 8+ years helping brands craft visual identities. Specialist in color theory, layout composition, and design systems.
Where you place your design on a custom crewneck sweatshirt is just as important as what the design looks like. The crewneck silhouette offers a uniquely clean canvas compared to hoodies, with no hood, drawstrings, or kangaroo pocket to work around. This means every print zone is accessible and unobstructed, giving designers more freedom and flexibility.
This guide covers every printable area on a crewneck sweatshirt, including dimensions, best practices, and when to use each zone for maximum visual impact.
Why Placement Matters on Crewnecks
Design placement affects visibility, wearability, and perceived quality. A logo positioned too low on the chest gets hidden when the sweatshirt is tucked or layered. A back design placed too high gets covered by hair or hoods from other garments. Understanding the optimal placement zones ensures your design is seen exactly as intended in real-world wearing conditions.

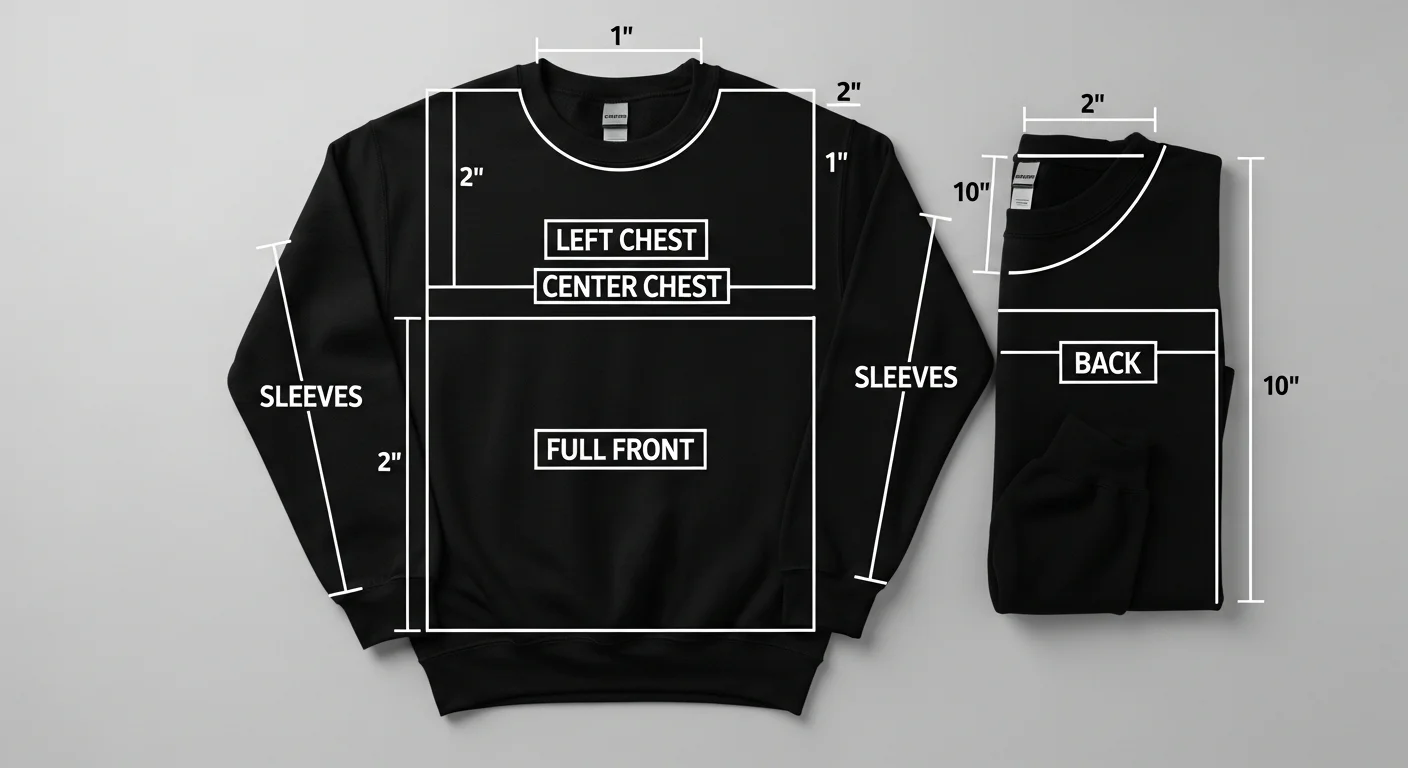
Left Chest: The Corporate Classic
The left chest is the most common placement for professional and corporate branding. The standard print area is 3 to 4 inches wide by 3 to 4 inches tall, positioned above the heart. This zone is visible when wearing an open jacket, sitting at a desk, or standing in a group photo.
Left-chest placement is ideal for embroidered logos, small brand marks, and monograms. It communicates professionalism and restraint. When combined with a back design, the left-chest logo provides front-facing brand identification while the back carries larger messaging.
Center Chest: The Bold Statement
Center-chest placement spans approximately 10 to 12 inches wide and 5 to 6 inches tall, positioned between the armpits and above the navel. This is the primary impact zone for statement designs, large logos, and graphic artwork that needs to be seen from a distance.
For custom crewnecks, center chest is the most popular placement for retail merchandise, event sweatshirts, and brand launches. The uninterrupted front panel of a crewneck makes this zone shine compared to hoodies where pocket seams break up the space.
Full Front: Maximum Impact
Full-front designs can span up to 14 inches wide and 16 inches tall, covering most of the garment's front. This placement works for bold, oversized graphics, all-over patterns, and designs that intentionally dominate the garment's appearance.
Consider how full-front designs interact with the crewneck neckline. Leaving at least 2 inches of space below the collar prevents the design from disappearing into the neckline fold and ensures a clean boundary between fabric and print.
Full Back: The Billboard
The back of a crewneck sweatshirt offers the largest uninterrupted print canvas, approximately 14 inches wide by 17 inches tall. This is the go-to zone for detailed designs, text-heavy layouts, event information, roster lists, and large graphic statements.
Position the top of your back design 3 to 4 inches below the collar seam. This prevents the design from being hidden by collars on jackets or coats and keeps it visible from behind in any layering scenario.
Sleeve Prints: The Secondary Design Element
Sleeve placement is trending for 2026, with designers using the left or right sleeve for secondary logos, text running down the arm, or small accent graphics. The printable area on a sleeve is typically 3 to 4 inches wide and up to 12 inches long, positioned on the outer arm.
Sleeve prints add a premium, customized feel to crewnecks without competing with the primary front or back design. They work especially well for brand names, website URLs, or simple wordmarks.

Collar and Neckline Tag: Internal Branding
Tagless neck printing replaces the manufacturer's tag with your own branded label printed directly inside the collar. This small detail elevates perceived quality and keeps your brand visible every time the wearer puts the crewneck on. The typical print area is 2 to 3 inches wide and 1 to 2 inches tall.
Multi-Location Designs
The most impactful custom crewnecks combine multiple placements strategically. A common and effective combination is a left-chest embroidered logo on the front with a large screen-printed graphic on the back and a sleeve wordmark. This three-location approach provides 360-degree branding without any single design element overpowering the others.
For hoodie-specific placement guidance, our companion guide addresses hood and pocket print zones that crewnecks do not have.
Frequently Asked Questions
Can I print on the collar or inside the neckline?
Yes. Tagless neck printing is available and adds a professional, branded touch. The print area is limited to approximately 2 by 3 inches, so keep the design simple, typically your logo and size.
What is the maximum print area on a crewneck sweatshirt?
The maximum varies by garment size but generally tops out at 14 inches wide by 17 inches tall on the back of an adult XL crewneck. Front prints are slightly smaller to maintain distance from the collar and hem.
Do seams affect design placement?
Yes. Avoid placing design elements directly over side seams, shoulder seams, or armhole seams. Printing over seams creates uneven ink coverage and can distort the design. Maintain at least a half-inch margin from any seam.
Share this article
Written by
Jordan Reeves
Brand Experience Strategist at RareCustom. BFA in Graphic Design from Parsons School of Design with 8+ years helping brands craft visual identities. Specialist in color theory, layout composition, and design systems.