How to Order Custom T-Shirts in Bulk: The Complete Checklist
Step-by-step checklist for ordering custom t-shirts in bulk. Size collection, artwork prep, timeline planning, and cost-saving strategies for large orders.
Natalie Voss
Founder & CEO of RareCustom. Natalie's 8 years in e-commerce operations gave her firsthand expertise in managing large-scale custom apparel orders efficiently.
Ordering custom t-shirts in bulk for your team, organization, or event should be exciting, not stressful. But without a clear plan, large orders can quickly become chaotic. Sizes get mixed up, deadlines get missed, artwork files get rejected, and what should have been a straightforward process turns into weeks of back-and-forth emails and last-minute scrambles.
This guide eliminates the guesswork. Below you will find a comprehensive, step-by-step checklist that covers everything from initial planning through delivery and quality control. Follow each step in order and you will have a smooth, cost-effective bulk ordering experience every single time.
Phase 1: Pre-Order Planning
Define Your Timeline
The most common bulk order mistake is underestimating how much time the process takes. From design finalization to delivery, a standard bulk order takes two to four weeks. Rush orders can shorten that window but typically come with premium charges of twenty to fifty percent.
Work backward from your event date or distribution day. If you need shirts by June 15, start the process no later than May 15. Add an extra week if you are collecting sizes from a large group, another week if the design is not yet finalized, and another few days if you want to approve a sample before the full run. Building in buffer time is always cheaper than paying for rush production.
Set Your Budget
Bulk pricing works on tiers: the more you order, the less each shirt costs. Understanding these tiers helps you plan strategically. For example, if your group needs 45 shirts but the next pricing tier kicks in at 50, ordering five extra shirts may actually reduce your total cost. Our pricing guide breaks down exactly how volume discounts work across different printing methods.
Your budget should account for the blank shirt cost, printing cost, potential setup fees, shipping, and a ten percent contingency for size exchanges or last-minute additions. Getting all of these numbers upfront prevents surprises when the invoice arrives.
Determine Your Quantity
Order more than you think you need. A standard rule of thumb is to add ten to fifteen percent to your headcount. These extras cover late additions, size exchanges, and future needs. Reordering a small number of shirts later is almost always more expensive per unit than adding a few extras to the original bulk order.
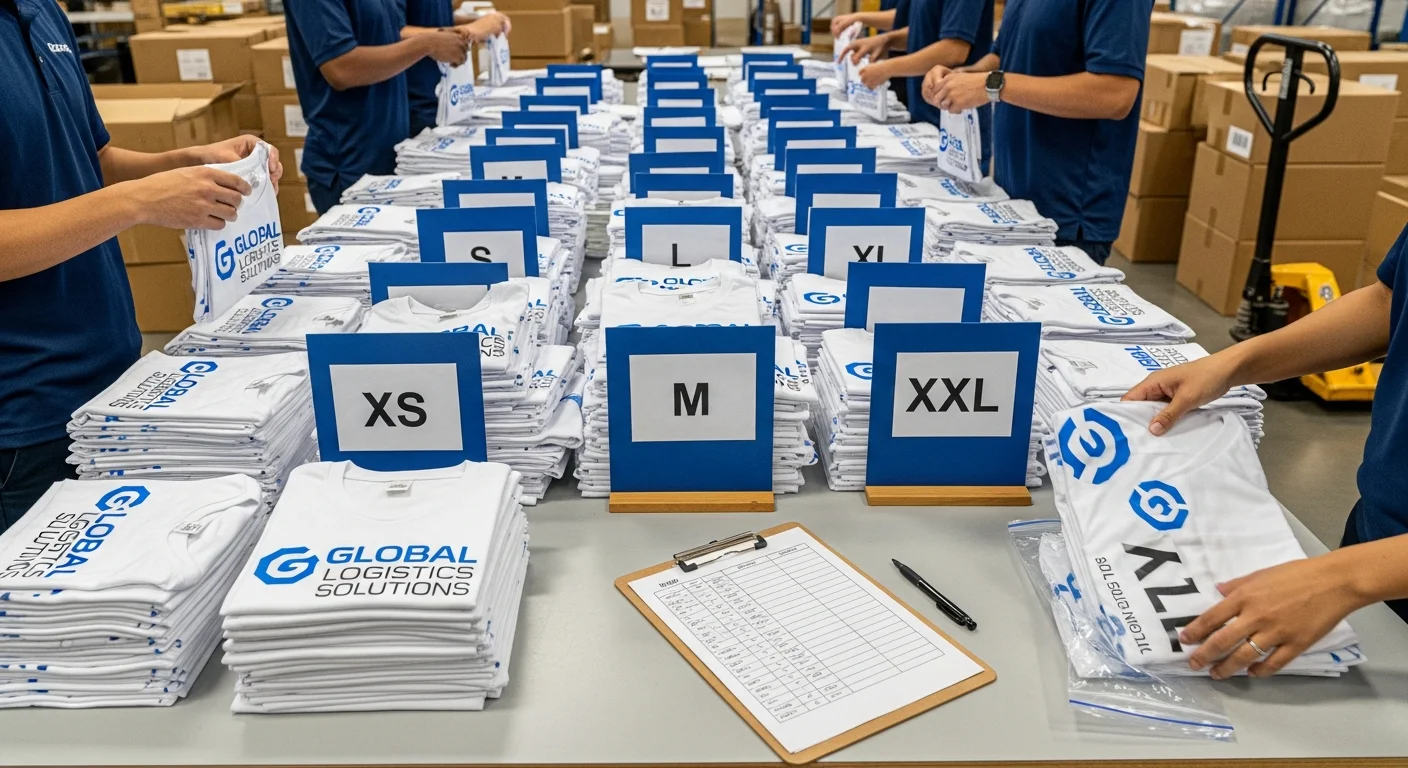
Phase 2: Collecting Sizes

Size collection is where most bulk orders hit their first snag. Here is a system that works for groups of any size:
- Create a shared form or spreadsheet with columns for name, size (XS through 3XL), and preferred fit (unisex or fitted) if you are offering both options.
- Include a size chart with actual measurements rather than just letter sizes. A "Large" varies dramatically between brands, so providing chest width, body length, and sleeve length in inches eliminates confusion.
- Set a firm deadline and communicate it clearly. Send the form at least two weeks before you need final numbers. Follow up three days before the deadline and again on the final day.
- Choose a default size for anyone who does not respond. Medium or Large unisex is the most common default. Note on the form that non-responders will receive the default size.
- Save the data for future orders. Most organizations order shirts more than once, and having historical size data eliminates this step entirely for repeat orders.
For very large groups (100+ people), consider using a Google Form that automatically populates a summary spreadsheet. This eliminates manual data entry and reduces errors significantly.
Phase 3: Artwork Preparation
Your artwork file is the blueprint for every shirt in your order. Submitting the wrong format, resolution, or color mode is the fastest way to delay your order or end up with a print that does not match your expectations. Here is your artwork checklist:
- File format: Vector files (AI, EPS, SVG) are ideal because they scale infinitely without quality loss. If you have a raster file, use PNG at 300 DPI minimum. Avoid JPEG for final artwork because compression introduces artifacts.
- Resolution: 300 DPI at the actual print size. If your design will be 12 inches wide on the shirt, the file should be 12 inches wide at 300 DPI (3600 pixels wide).
- Color mode: CMYK for full-color prints, Pantone (PMS) for spot color screen printing, and RGB only if specifically requested by a DTG printer that handles conversion in-house.
- Bleeds and margins: Keep critical design elements at least half an inch from the edge of the print area. This accounts for slight variations in print placement across hundreds of shirts.
- Fonts: Outline or rasterize all fonts before submitting. If the printer does not have your font installed, the text will default to a system font and ruin the design.
- Mockup: Include a mockup showing the design positioned on the shirt. This removes ambiguity about placement, scale, and orientation.
If you are not sure your artwork meets these requirements, most printers offer a free art review. Submit your files and let their prepress team flag any issues before production begins. For design fundamentals, our common mistakes guide covers the pitfalls that trip up even experienced designers.
Phase 4: Choosing the Right Printing Method
The printing method you choose affects cost, quality, color options, and turnaround time. For bulk orders, two methods dominate:
Screen printing is the gold standard for bulk orders of 25 or more shirts with designs using one to four colors. Setup costs are higher because each color requires a separate screen, but the per-unit cost drops dramatically at volume. Screen printing delivers the most durable, vibrant results and is the fastest method for large runs.
DTG (direct-to-garment) printing is better suited for full-color designs, photographic prints, or orders where every shirt has a different design (such as personalized names). There are no setup fees, making it cost-effective for smaller quantities within a larger order. However, per-unit costs are higher than screen printing at volume.
For a detailed comparison of these methods, including cost breakdowns at different quantities, see our screen printing vs DTG guide.
Phase 5: Negotiating Bulk Pricing

Bulk pricing is not always automatically applied. Here are strategies to ensure you get the best possible rate:
- Ask about tier thresholds: Most printers have pricing tiers at 24, 48, 72, 144, and 288 units. Knowing these thresholds helps you optimize your order quantity.
- Consolidate designs: If you need shirts for multiple departments or events, combining them into a single order often qualifies for a higher tier discount even if the designs differ.
- Reduce colors: Each additional ink color in screen printing adds cost. If budget is tight, consider simplifying your design to one or two colors.
- Choose standard shirt colors: Specialty garment colors sometimes carry a premium. Sticking to common colors like black, white, navy, and heather gray keeps blank costs down.
- Negotiate repeat order pricing: If you order regularly, ask for a standing discount or pre-negotiated rate. Printers value recurring business and will often offer five to fifteen percent off for committed repeat customers.
Phase 6: Sample Ordering
Never skip the sample step for orders over 50 units. A single sample shirt costs a fraction of a full run and can save you from expensive mistakes. When evaluating your sample, check for color accuracy against your original design file, print placement and alignment, print feel and weight on the fabric, garment fit and fabric quality, and wash durability after one or two cycles.
If the sample is not right, this is the time to make adjustments. Changes after full production has begun are either impossible or extremely costly. Most printers include one round of revisions in the sample process at no additional charge.
Phase 7: Shipping and Logistics
Shipping bulk orders requires planning, especially if shirts need to be distributed to multiple locations or individuals. Consider these factors:
- Single destination: The simplest and cheapest option. All shirts ship to one address for in-person distribution. Factor in storage space for boxes upon arrival.
- Multiple destinations: If shirts need to go to different offices, chapters, or individuals, ask the printer about split shipping. Some printers offer this service for an additional per-address fee. For remote teams, a print-on-demand approach may be more efficient than bulk ordering and reshipping.
- Shipping speed: Standard ground shipping for bulk orders typically takes three to seven business days. Expedited shipping is available but can significantly increase costs for heavy multi-box shipments.
- Packaging: Confirm how shirts will be packed. Individually poly-bagged shirts sorted by size are easiest to distribute. Loose-packed shirts in bulk boxes are cheaper but require sorting on your end.
Phase 8: Quality Control on Arrival
When your order arrives, resist the urge to immediately hand out shirts. Spend thirty minutes on quality control first. Open every box and check for correct quantities per size, consistent print quality across shirts (compare the first and last shirts printed), color matching against your approved sample, correct placement and alignment of the design, and any defects in the blank garments themselves (stains, holes, or incorrect colors).
Document any issues with photos and contact the printer immediately. Reputable printers will replace defective shirts at no charge, but most require notification within a specific window, typically seven to fourteen days from delivery.
Phase 9: Common Bulk Order Pitfalls
- Not ordering extras: You will always need more than your exact headcount. Order ten to fifteen percent extra.
- Waiting until the last minute: Rush fees can add thirty to fifty percent to your total cost. Start early.
- Ignoring size distribution: Do not guess at sizes. Collect actual preferences from every recipient.
- Submitting low-resolution artwork: Blurry or pixelated prints cannot be fixed after the fact. Submit 300 DPI minimum.
- Skipping the sample: The cost of one sample is negligible compared to the cost of reprinting an entire order.
- Choosing the wrong printing method: Screen printing and DTG have different strengths. Match the method to your design, quantity, and budget.
Phase 10: Reorder Planning
If your shirts are for an ongoing need (company uniforms, recurring events, merchandise), plan for reorders before your first order even arrives. Save your artwork files in their original editable format, document the exact shirt brand, style number, and color, keep your size distribution spreadsheet updated, and note the printer's contact information and your negotiated pricing.
Many organizations benefit from setting up a standing order schedule, perhaps quarterly or biannually, to ensure they always have fresh inventory without the stress of starting from scratch each time. For businesses considering turning their custom shirts into a revenue stream, our small business branding guide explores how branded apparel drives both culture and revenue.
Frequently Asked Questions
What is the minimum order for bulk custom t-shirt pricing?
Most printers define "bulk" as 24 units or more, which is when volume pricing tiers typically begin. Some printers offer tiered discounts starting as low as 12 units for DTG printing. The most significant per-unit savings usually kick in at 48, 72, and 144 units. Always ask your printer for a complete pricing tier breakdown before placing your order.
How far in advance should I place a bulk t-shirt order?
Plan for a minimum of three to four weeks from order placement to delivery. This includes one week for artwork finalization, one to two weeks for production, and three to five business days for shipping. If you need a sample approved before production, add another week. For time-sensitive events, start the process six to eight weeks in advance to avoid rush fees and ensure adequate buffer for any issues.
How do I handle size exchanges for bulk orders?
Order ten to fifteen percent extra across your most common sizes (typically Medium, Large, and XL). These extras serve as your exchange inventory. For the exchange process, set a window of one to two weeks after distribution during which recipients can swap sizes. If you run out of a specific size, most printers can fulfill small add-on orders, though per-unit costs will be higher than the original bulk rate.
Is screen printing or DTG better for bulk orders?
For bulk orders of 25+ units with simple designs (one to four colors), screen printing is almost always more cost-effective and produces the most durable results. DTG is better when your design includes complex full-color artwork, photographic elements, or when each shirt in the order needs a different design (such as individual names). Many printers recommend screen printing for bulk orders because the per-unit cost decreases dramatically as quantity increases.
Can I order different designs in the same bulk order?
Yes, but it depends on the printing method. Screen printing requires separate screens for each design, so different designs within the same order may not benefit from the same volume pricing. DTG printing handles design variation seamlessly since there is no setup cost per design. If you need multiple designs across the same bulk order, discuss options with your printer to find the most cost-effective approach. Consolidating into a single order still usually saves on shipping and handling compared to placing separate orders.
Share this article
Written by
Natalie Voss
Founder & CEO of RareCustom. Natalie's 8 years in e-commerce operations gave her firsthand expertise in managing large-scale custom apparel orders efficiently.